The Why
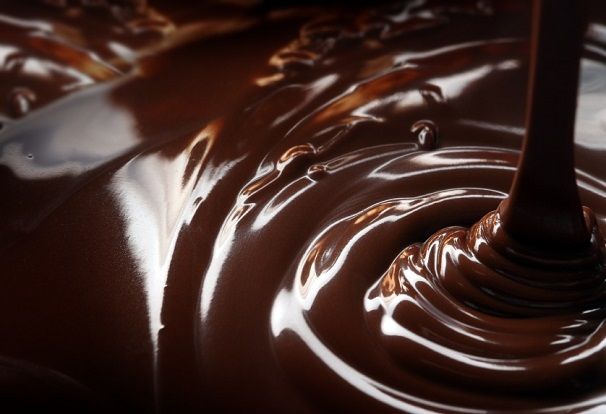
Believe it or not, the holidays are just around the corner (yikes!). With that in mind, I’ve decided I’m going to try my hand at making a few truffles to give away during the season. While researching how truffles are made (they’re actually quite easy to make, fyi) I started wondering why is everyone so particular about the way they temper chocolate? Turns out, if you’re making anything that’s covered in chocolate, any kind of chocolate candy with a chocolate shell or maybe homemade chocolate bars (bless you) or madeleines dipped in chocolate, then it’s essential that you temper your chocolate properly. Not doing so will result in a product that might taste good, if it isn’t scorched but soon enough you’re bound to see that white or beige dust on the outermost layer of your confection. Wonder what that is? Is it old chocolate perhaps? No. Actually it’s ill-tempered chocolate. That’s right chocolate with a bad disposition thanks to the fact that you haven’t treated it with the tender loving kindness it deserves.
But seriously, if you want to make chocolate that both looks good and tastes good, go with a nice, high-quality milk, semi-sweet or dark. If you go with dark or bittersweet David Lebovitz suggests sticking to 70% or less. Beyond 70% the behavior of the chocolate changes a bit and that’s probably best handled by chocolatiers.
The How
**Note water is the enemy of chocolate! The number one lesson when learning how to temper chocolate is that water is a no-no and preparation is very, very important! So make sure your spatula, surfaces and hands are dry. You’re also going to need a good candy or chocolate thermometer. Digital is the way to go since temperature is very important.
You’re going to need your chocolate, a glass or aluminum bowl and a saucepan. What we’re doing is making our own double boiler. The diameter of the saucepan should line up with the bottom of the bowl nicely so that when you place the bowl on top of the pan, most of the bottom sits on top of the pan and doesn’t totter. This won’t only make it safer, it will ensure a more even distribution of the heat. *It’s probably a good idea to read the label on your chocolate fully. Tempering ranges can vary, so it’s best to go with the manufacturer’s recommended temperature. If not, I have the approximate ranges listed below.
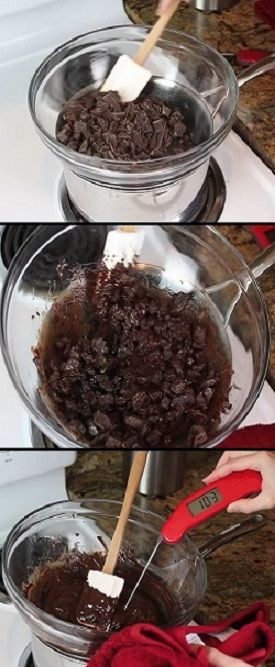
#1 – If your chocolate is in large pieces, you’re going to want to segment it. Crack it up into quarter sized pieces.
#2 – Pour water into the saucepan. It should be about one-quarter to one-third full. The steam from that rises from the water is going to be what melts the chocolate so just a little water is required.
#3 – Heat water on medium high heat.
#4 – Place one-third (1/3) of the chocolate in the bowl. Leave aside.
#5 – Once the water reaches a light boil (about 115º-120º F), turn the heat down just a bit.
#6 – Place the bowl on top of the pot. With spatula, stir the chocolate frequently.
#7 – Stir constantly. The moment it melts, take temperature. DO NOT exceed 91º F.
#8 – If necessary, lift the bowl away from the heating element for a few seconds to keep the temperature within the lower to mid 80s.
#9 – Add another one-third (1/3) handful by handful. Stir constantly.
#10 – Take the temperature.
#11 – Remove from heat and add the remaining one-third (1/3), handful by handful. *This last part is what they call “seeding” so now you know.
#12 – Now once you’ve got a nice bowl full of melted chocolate, you’re going to place it back on top of the saucepan to reach the perfect temperature. Stir and take the temperature and remove from the heat the moment you reach the target.

Target Temperatures for Milk Chocolate
Most milk chocolates are perfectly tempered at somewhere between 86º-88ºF.
Target Temperatures for Semi-sweet and Dark Chocolate
Dark and semisweet chocolate tempers at 88° to 90°. I shoot for 89° just to be safe.
Your chocolate is now ready for dipping! To prevent the whole batch from getting unwanted moisture from let’s say a dipped strawberry, just pour your tempered chocolate into a warm bowl (microwave for 15 seconds). You can reheat your tempered chocolate as many times as you like, just be careful not to scorch it!
Now all you need to do is dip, pour or spread that chocolate! Wax Paper and Silpat mats work best for letting that chocolate cool. There’s no need for refrigeration. Properly tempered chocolate will harden at room temperature.
Things to Dip
Dried mango slices
Graham crackers
Sweetened coconut (rolled into balls)
Lollipops
Peanut Brittle
Biscotti
Cookies (any kind)
Strawberries
Raisins
Cranberries
Bananas
Freeze dried fruit
Marshmallows
Licorice
Cheese
Or, go ahead a make truffles! I’ll hunt down a great recipe and share with y’all on a later post! Until then…
Happy Eating (and chocolate making) !